Showing posts with label Education. Show all posts

Friday, November 9, 2012

Inspiration: How to use the Twister Tool


This month's inspiration from Ilene is a mini-tutorial on how to use the Lil' Twister Tool from Country Schoolhouse Designs.  


To make the twister blocks, you will need a charm pack or fabrics cut into 5-inch squares. If you want the twisters to "float" on a background (as shown above) you will need to cut squares from a background fabric also.


Arrange the squares and sew them together as shown above if you want the twisters on a background. If you want the twisters to interlock, simply sew the colored squares together without the background color. Add a 3'' contrasting border to the entire piece if you want a border to frame the twisters (see quilt example above- orange border). 


To cut the shapes, position the tool so the marks line up on the seams and carefully cut with a small rotary tool. 


The cut shapes should be positioned in exactly the same order they were cut so the twisters will match up and sewn together. The finished quilt will be about 1/3 smaller than the first size you start with but then you can add borders if you want
Ilene says that if you cut carefully you can use the leftover pieces to create an outer border for the quilt so very little fabric is wasted. 


Tuesday, April 10, 2012

Messenger Bag & Half Rectangle Triangles

 Thanks again to Des for teaching us so many neat things today!! If you missed it, or you want to do your own here are the links that she taught us.

Messenger Bag from the blog Betz White.


 To check out the tutorial & instructions on how to change a cheap canvas bag into this adorable messenger here.


Half Rectangle Triangles from the Modern Quilt Guild.

l


Click Here                


Thursday, February 23, 2012

Exploding Rail Block

A big thank you to Terry for showing us this idea (by the Missouri Quilt Co. & 3 Dudes Quilting). & then for Terry sending the link so we could all see it again.


The video is found on You Tube Here if this link doesn't work.


  Or here is the same idea, a slightly different version,  on this tutorial at Two More Seconds.

process tutorial - 7
               (Picture from 2 More Seconds Blog)
  

Here is the link for the tutorial.  from Two More Seconds Version.  


So here is the Challenge for March:

  Take this video & create your own variation. You could do it with 3,4,5,6 strips, or certain colors, change the thickness. Anything you want. Just try something & then show up with it for  the March meeting & share. We would love to see your variations that you come up with & the different ways it could turn out.  So watch the video, get busy & we will see you with your completed challenge in March. 


Tuesday, February 21, 2012

Instructions for Pinwheel Toss

Here is the link for the Pinwheel Toss, that Ilene taught at the meeting in February.
 This picture was taken Sew We Quilt blog, but here is where the instructions for the Pinwheel Toss are at Sew We Quilt. (Just click on their name & it should link you over.) 


Picture of the finished Pin Wheel Toss block from Sew We Quilt


We will also try to get the instructions for the Exploding Rail Block on here soon, so you can complete your challenge before the March Meeting! 


Friday, January 27, 2012

It's in the Bag!


In September, Ilene showed us some of the amazing bags and totes she has made. This was such a fun and inspiring demonstration with so many ideas.
Ilene loves to use materials that you wouldn't always consider for her bags - jeans, napkins, sheets, shirts, corduroy and even fused paper!


This paper "fabric" is made by fusing layers of pattern tissue together. She quilted it and dabbed some gesso on one side and used pieces of coordinating fabric to make this adorable gift bag!!!


She added  the cutest details to her bags!


One of the favorite bags she showed was a black and white "pockets aplenty" tote that has lots of pockets on the inside, too. Ilene's bag also has a layer that can be pulled up and closed with a drawstring to give even more room!

Ilene demonstrated how to make sweet square zipper bags (one is shown in the photo above) that can be adjusted and made in any size. A free pattern for the sweet zip bag and a couple other bags by Terry Atkinson can be found here.

Ilene said she always uses interfacing on the lining and the bag to give them body and make them sturdy. She also quilts the bag and the lining and she always uses a denim needle to sew bags. 


And here is one more bag Ilene made from a cat food bag. The handles on this are actually the plastic handles from bags of sugar - she just sewed them on to her kitty bag! That is pretty resourceful and fun!

Here are a few websites where Ilene gets some of her bag patterns and ideas:
www.pursepatterns.com  (this site has some free patterns, too)

Tuesday, November 8, 2011

Serendipity Quilt Demo

Click here to see the block/video that 
Donna demonstrated today!

Tuesday, August 9, 2011

Bring Out Your Inner Sherlock!

Join us for a Mystery Quilt Along at the Tuesday Club!!  
We will tell you the supplies you need and what to sew each month.  The pattern will be a mystery.  You will channel Agatha Christie as you try to find out what we're doing!  

This quilt works well with scraps as well as being a great leaders and enders quilt!

We are gathering supplies and starting our first step to be completed by the September Meeting. 

Supplies:  
*3 Charm packs (with a minimum of 40 charms each)
*3 1/2  yards in a solid. This will be for your blocks and the 1st 2" inside border. OR you can also use 3 Moda Bella Solid Charm Packs and get an additional *2/3 yard for the 1st inner border.
*Border 2 - 1 yard in print of choice

1st step:  From your solid fabric, cut 75 – 5” squares.  (approx. 10 strips of 5”) 
With one charm and one solid, make a triangle square.
……ooohhh such a mystery. Next step, next month!

Tuesday, April 12, 2011

Rainbow Block

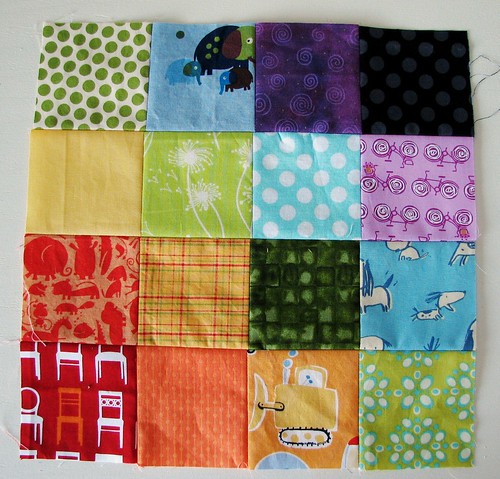
After learning about the color wheel today, Donna introduced the idea of making a rainbow block for charity. 
 Sample Block for Joy Circle January   do.Good Stitches
These instructions make 2 (two) 12 1/2” blocks. You can choose how many you'll make for our charity children's quilt.  Participation optional!!  But we'd love to see what you come up with!

Cut each square 3 1/2” square
2 red 
4 orange 
6 yellow 
8 green 
6 blue
4 purple
2 black 


Red is in the lower left corner and the black is in the upper right corner. Try to choose bright happy fabrics and a few prints sprinkled in since this is a child's quilt.

Sew together like the photo using a 1/4" seam.
Needs to measure 12 1/2"